I've had many people ask me how I ice my cookies so I thought I'd take pictures as I worked on some. I just want to say that there are many icing tutorials out there and that this will probably not be the best one you've read :) But hopefully it might answer some questions.
Also, this is just how I do it. I've read a lot of other blogs and tried some different tips and techniques, some work for me and some don't. But this is the way I like to do it. So if you're wanting to try, I encourage you to just jump in and get started! Then as you do it more, you'll find little things that work better for you.
Ok, here goes...
Here is the royal icing recipe I use. I usually double the recipe so that I'll have plenty of icing. When you're coloring it, it's not fun to try to match the colors if you have to make more.
This is what the icing will look like after it's done. It will be very stiff and thick.
I like to separate the icing into the different colors I'm using. Then I add just a little bit of water to it to make it easier to pipe on the cookie. It needs to be glossy and smooth and the peaks should curl down just a little bit. This is one of those things that the more you do it, you'll get a better idea of the consistency you need.

Ok, so this is probably the best tip I've learned through my whole cookie making experience! When I saw
this video, it changed my life. Ok so that's a bit dramatic but seriously, this makes cleaning your icing bags so simple! Here is the video but I'll show you in pictures too. The video is probably a lot better! So first you lay out a piece of plastic wrap. Then put your icing in the middle. This is the icing that you're going to pipe on the cookie to outline them. (This plastic wrap is red because I got it at Christmas)
Then roll over the sides on top of each other.

Then take the ends with both hands and you'll lift up the icing and you'll move your hands in a circular motion and you'll end up with it like this. (This is where you might want to watch the video, I can't think of a way to describe that part!)
These are couplers that are wonderful to use! It makes it possible to change icing tips on the bag so you don't have to have multiple bags for a different size tip. You can find these at Walmart, Hobby Lobby, and other craft stores.
You put the large part down into the decorating bag (also at the stores above) after you cut the bag to fit it.

Then you'll put one end of the plastic wrap down into the bag and pull it through until the icing is at the end of the coupler.

Then cut off the end of the plastic wrap.
Then put your tip over the coupler and then screw the smaller part of the coupler on there. Now you're ready to start piping on the cookies! (When you're done with the icing, just pull the other side of the plastic wrap out of the decorating bag and throw it away! SO much easier than putting the icing straight into the bag and having to wash it out!)
Oh and I use a #3 icing tip to outline.
To get started, I twist the top of the bag and then I squeeze to get the icing into the icing tip. To pipe on the cookie, just put the icing tip down where you want to start and slowly squeeze the bag. I use my left hand to just help me guide it and to keep my hand from shaking.
I like to lift the icing up as I go so it makes a smooth line. If you keep it real close to the cookie, it's not as straight and also the icing tip kinda messes up the line if it touches it as you go.
Then just keep going until you get back to where you started.
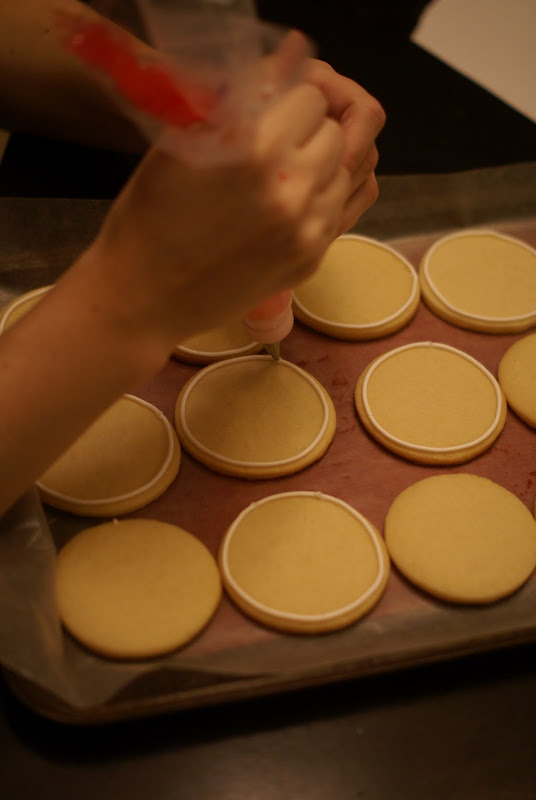
And then when you get to your starting point, just touch the icing where you started and stop squeezing and lift up. Then finish the rest of your cookies! Sometimes I'll mess up and need to scrape it off, which is really easy to do. Then just start over!
Now it's time to work on your "flood" icing. This is what you'll use to fill in the outline you've made. I add just a little bit of water at time to the icing until I get the consistency that I want. You want it to be about the consistency of syrup. Again, the more you do it, the better you'll get at knowing how it should be. Hopefully this picture gives you an idea.
Let it sit for just a few minutes so the air bubbles rise to the top. Then just stir it to pop them.

I like to use these squeeze bottle to flood the cookies.
I can't believe I was able to take this picture while I was pouring the icing without making a huge mess! But anyway, there's no real trick to getting it in the bottles, it gets a little messy!

Then just start filling in. I like to go around the edges first.
Then fill in the rest of it.
Let it sit for just a minute or 2 and then pop any air bubbles that you see.
I like for them to dry overnight and then you can do your details the next day. For the details, I use the same icing consistency that I used to outline the cookies.
So there you go! Hopefully that made a little bit of sense :)
Pin It


 I have found so many new ideas lately, thanks to Pinterest! I could just spend hours on there. There are SO many amazing cookie decorators and I've enjoyed getting some new ideas.


 Ok, so this is probably the best tip I've learned through my whole cookie making experience! When I saw this video, it changed my life. Ok so that's a bit dramatic but seriously, this makes cleaning your icing bags so simple! Here is the video but I'll show you in pictures too. The video is probably a lot better! So first you lay out a piece of plastic wrap. Then put your icing in the middle. This is the icing that you're going to pipe on the cookie to outline them. (This plastic wrap is red because I got it at Christmas)
 Then take the ends with both hands and you'll lift up the icing and you'll move your hands in a circular motion and you'll end up with it like this. (This is where you might want to watch the video, I can't think of a way to describe that part!)

 Then cut off the end of the plastic wrap.


 And then when you get to your starting point, just touch the icing where you started and stop squeezing and lift up. Then finish the rest of your cookies! Sometimes I'll mess up and need to scrape it off, which is really easy to do. Then just start over!

 I like to use these squeeze bottle to flood the cookies.
 Then just start filling in. I like to go around the edges first.